
Changing Port Settings
To access the Change Port dialog, do one of the following:
- Right-click a device setup and click Change Port.
- Double-click the device icon.
The Settings section of this window changes depending on the port used to connect to the output device. Ports are listed in order of popularity for each device. Only the ports usable by the output device are listed. By default, the standard port for the device is selected, but you may still need to enter or edit some of the port settings.
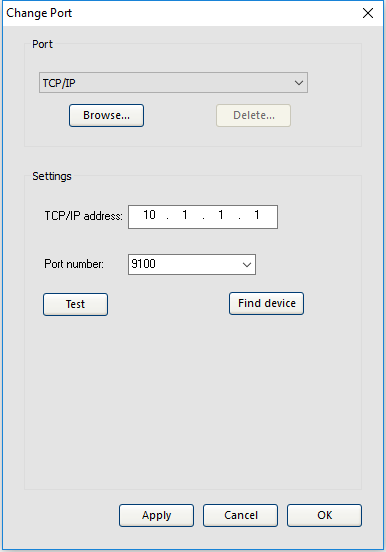
| Port | ||||
| TCPIP | Use this port if your output device supports network connection. This is the most common port for printers today and several cutters are also supporting network connections | |||
| TCPIP address | The TCP/IP address of the output device (required). | |||
| Port Number | The port number used for printing to the output device. Select from the list or enter a custom number. | |||
| Find Device | Clicking this button will perform a search in your network for all printers. Not all printers support this. | |||
| Test | Clicking test will send a ping command to the device to test the connection. | |||
| USB | USB drivers are provided with output devices that support them. Be sure to install the proper drivers when using these ports. | |||
| FILE | The File port allows you to save the output data as a file. The following settings are available: | |||
| Prompt for file path for each file | Check to allow the software to prompt you to provide a filename for the output file when each job is saved to a file. | |||
| Use custom extension | Check to enter the file extension you want to use for the output file in the space provided. | |||
| Default Location | The default folder in which output files are placed. | |||
| Folder | Outputs to a file in the specified folder using a naming convention specific to the output device. | |||
| COM | The serial communications port. This port is only supported by cutters. | |||
| In addition to the standard serial port controls for bits per second, data bits, parity, stop bits and hardware/software flow control, there are checkboxes which enable/disable the following wires: | ||||
| DTR | Data Terminal Ready | |||
| DSR | Data Set Ready | |||
| RTS | Request To Send | |||
| CTS | Clear To Send | |||
| DCD | Data Carrier Detect | |||
| Port | LPT | This port is rather uncommon today but might still be needed for some older printers | ||
| Transmission buffer | The size of the transmission buffer in bytes. | |||
| Check port state before sending | The software tests the printer for a connection before printing the job. | |||
| Use standard LPT driver | Whenever possible, the software uses a custom LPT driver to increase the performance of the LPT port. Check to allow the software to use the standard Windows LPT driver instead. Performance diminishes, but reliability may enhance. The following settings enable when the custom driver is in use: | |||
| Mode | Use ECP (Enhanced Capabilities Mode) for the fastest possible transmission speed. | |||
| EPP (Enhanced Parallel Port) is not as fast, but may be more compatible. | ||||
| DMA | Using DMA can increase the maximum bit rate from 2 mbps to 4 mbps. | |||
| Yield if device is busy | Check to allow the software to release the extra system resources used by the custom driver while the printer is busy. This may aid overall performance. | |||
| SCSI | Use this port if your output device supports SCSI connection. This is also an uncommon port today. | |||
| Device | Select your SCSI Device | |||
| SCSI Bus ID | Enter the Bus ID of your SCSI adapter | |||
| SCSI Adapter ID | Enter the SCSI ID number of your SCSI adapter | |||
| SCSI Target ID | Enter the SCSI ID number of your output device | |||
| FTP | Output devices directly connected to a network may support FTP protocol. This allows the RIPed output file to be sent to the output device via FTP. | |||
| Host name or IP address | The host name or IP address assigned to the output device (required). | |||
| Printer/ Queue name | Depending on the output device, either this can be the printer name, such as pr1, or it can be the path to a UNIX print queue. | |||