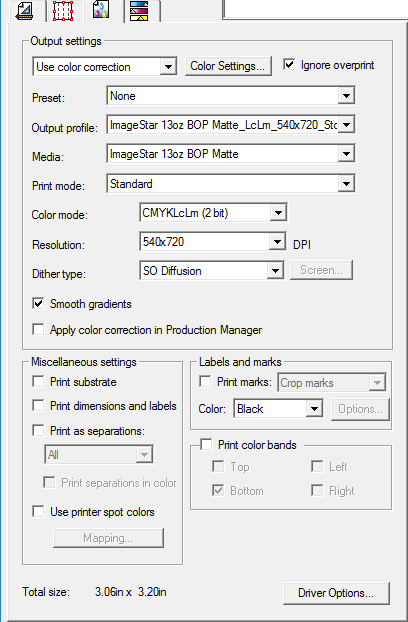
RIP and Print Dialog Box Advanced Tab
The Advanced tab allows you to set advanced options specific to color printing jobs.

Output Settings
| Color Correction | ||
| Use Color Correction | Switches on the icc profile. | |
| Linearization Only | Uses only the linearization table and ink limits of the icc profile. | |
| No Color Correction | Switches color correction off. | |
| Color settings | Clicking this button will launch the Color Settings dialog box | |
| Ignore Overprint | Check to ignore any overprinting that was set up in the design stage. This can be useful if you want to save the time and output media needed to do overprinting. | |
|
If you check Ignore Overprint, your output will automatically be changed so that it will not use features that depend on overprinting. For example, output that had been set up to use color trapping will now output untrapped. |
||
| Output Profile | Output profiles are created for the combination of ink, media, resolution and dither type of your output device. When selecting a profile, be sure to select the profile that matches these criteria. Select Add to add ICC output profiles from another source. | |
| Preset | Select the preset to load the settings relevant to the Advanced tab from the preset. Only the settings relevant to the Advanced tab (media, color mode, dither type, etc.) will be loaded from the preset. | |
|
Loading settings from a preset only affects the Advanced tab; it does not set the job to automatically use that preset in Production Manager. |
||
| Media | This setting is automatically set when you choose an icc profile. It shows the media name your job will be printed on. | |
| Print mode | Select the desired quality of your printout. This setting is automatically set when you choose an icc profile. | |
| Color mode | If your output device supports multiple color modes, then you can select one of the supported color modes here. This setting is automatically set when you choose an icc profile. | |
| Resolution | Choose an appropriate DPI for your job. A higher DPI produces higher quality output but increases the processing time. | |
| Dither type | Selects the dither type, or the pattern in which the individual dots that make an image are applied to the media. | |
| Screen | Clicking the Screen button will launch a dialog box when the Angled Screen dither type is selected. You can adjust frequency, angle and shape for each output channel (CMYK). | |
| Smooth Gradients | Switches on 16 bit rendering. This improves the quality of gradients but does increase the processing time significantly. | |
| Apply Color Correction in Production Manager | Ignores all Color Correction Settings in the RIP and Print dialog and applies the settings that were set as default in Production Manager instead. | |
Miscellaneous Settings
| Print substrate | If checked, the color of the drawing area will be printed with the design | ||
| Print dimensions and labels | Selects if the labels and dimensions added with dimension/label tools will be printed with the design. | ||
| Print as separations | Check to print each color plane separately. You can select to print one color channel or all color channels as a separate job. | ||
|
|||
| Use printer spot colors | Allows you to map the spot color used in the design to specific ink in the printer |
Labels and Marks
Check Print Marks to print the selected type of mark. Set Color to the ink color that will be used to print the marks. The available types of print mark are:
| Crop Marks | Adds crop marks to the output to aid in trimming the printout. |
| Standard marks | Standard marks intended for aligning color separations. |
| Swatch | Color swatches for each color of ink will be printed around the job. |
| Overlap Marks | Overlap marks will be printed, indicating how the tiles of a tiled job should overlap. |
| Tonal Scale | Color swatches containing blended CMY colors and a gray scale will be printed around the job. |
| Margin | Marks will be printed at the corners of the job indicating its outside margins. |
| Border | A border will be printed around the outside edge of the job. |
| Tile Trim Lines | |
| Fotoba Mark | Marks will be printed for use with Fotoba trimmers |
| Fotoba Horizontal Mark | Horizontal Marks only for use with Fotoba trimmers will be printed |
| Neolt Cut Mark | Marks will be printed for use with Neolt trimmers |
Print Color Bands
Prints a thin strip of each ink color along the selected edges of the print to show that all print heads are firing.

Driver Options
Clicking this button opens the Driver Options dialog box.
